Several great videos caught my attention this week, in the wake of the latest update of Clash of Clans with the Lava Hound.
Godson used 3 Lava Hounds and 75 Minions to 2-star a buff TH10 in a Clan War. Wow. or "Yeaaaaaa!!" as Godson would say :)
MaddenDvinik posted some great 2-Star air raids from UN Epic Raids.
In the first video (at 1:38) there is a vanilla Balloonion attack that got a nice two-star on a near max TH10. Minions hit freebies then the attacker pre-raged left and right for a line deploy of balloons followed by a dragon from the clan castle. When archers and wizards poured out of the clan castle two lightning bolts crushed them. Finally, a rage on the TH secured the deuce.
Second video (2:35) showed a highly reliable mass dragon attack vs a strong TH10. The attack started off by using a CC golem and deployment of max heroes to clear the top quadrant (12:00-2:00 o'clock), including one AD and the AQ, using one rage spell. The other relevant AD was triple-bolted. Then seven (of 12) dragons were deployed to the east (2-4 o'clock) in order to clip outer buildings, lure and kill the CC. While they're were finishing up the remaining 5 dragons were deployed from the NE (2:00 o'clock) with a nice straight path to core. The last rage spell was deployed as they reached the TH and the infernos could do nothing to stop them. A solid two-star with 60% destruction.
Clash With Ed shared an advanced lesson - an Ed Academy video on getting two stars from even the toughest TH10 bases using Balloonion and high level heroes. If your heroes are lower level, hit a weaker base, but the principles here are solid and well explained: clip left and take out AQ+AQ, bolt out the right AD and clear % on that side with half your dragons, then deploy the other half in the middle for a clean path to the town hall.
Showing posts with label tutorial. Show all posts
Showing posts with label tutorial. Show all posts
Friday, September 19, 2014

Friday, September 12, 2014
Hogs Ride Again
I ran across a great strategy guide for Hog Riders in this brave new world of unlurable heroes and bigger giant bombs, by Noel. In the guide he covers general principles, then walks you through key tips for several different specific cases. The example videos are all from Clan Wars, so no preemie bases with empty clan castles!
Specifically Noel covers:
- Hogging a TH9 with Anti-hog base
- Hogging a TH10 for 3-Stars with a Single Mode Inferno and central heroes
- Hogging the popular TH10 box base
- A TH9 clan-mate 3-stars a Deep Lure TH9 with anti-hog ring
- Hogging a TH10 for 3* with Multi-mode (disco) infernoes
- Hogging for 3* a TH10 with Multi-infernoes and anti-hog ring (sheesh!!)
- Hogging a TH10 with one single tgt and one multi tgt inferno for 3*
- Hogging a TH10 for 3-stars (Using golem to take out AQ)
Friday, August 22, 2014
Introducing 'Clash with Ed'
Toucharcade1 has been doing a lot more GoWiPe (GOlem WIzard PEkka) attacks recently in our clan wars. It's a very difficult attack to master, but it's very effective when done well, able to two-star the strongest bases. We hope to have a solid guide at some point, but for now I wanted to provide some links to excellent GoWiPe attack, and give some detailed notes on one I thought was especially good!
I have a new YouTuber I'm following: Ed, a leader in the top ten clan, Quantum's Web. Ed just hit #7 in the world so he knows his stuff. He is especially good with Balloonion, so expect more videos from him later. Below are some links and comments he shared recently.
GoWiWiPe TH10 3-Star (9:25-11:30 in the video)
The attacker faces a popular "Southern Teaser" base - coming from the South tends to fail, and the North has a lot of compartments, so coming from East/West is a common route for Golem attacks.
Here he lays down Golems nicely spread out and basically "clips" the buildings down South so that the main force coming in through the middle hole will not be distracted to wander south, but will instead head into the core and take down the TH. Coming from East he takes on just one inferno at a time. Witches and wizards come behind the heroes and pekka and are nicely protected.The broad spread, witches, and great use of spells actually result in a 3 Star versus a solid TH10 base.
Hogs were seriously hurt by the last Clash of Clans update, but they're not dead! How they are used has changed a bit. The key change was unlurable heroes, and the new approach to deal with them at high levels is with heroes and witches to take out the opposing CC and royals. In this attack by Jenscee of Quantum's Web, he starts the raid with a couple of hogs to lure the CC and to detonate giant bombs. Their CC is killed with his own CC followed by King and Queen. As the army moves inside they get in range of the opposing AQ and BK where they are killed using hero abilities with wizard and witch backup. Once the heroes are under control, the attackers unleashes the hogs from the opposite side, in a double stream, with two heals near WT and possible bombs, then double freeze as they get near the infernos plus a well timed rage. An incredible 3-star attack! Had the hogs failed up north, this is still a definite 1-2 star attack -- unlike the old school hog attacks which got 3-stars or failed spectacularly!
Outstanding GoWiPe TH10 2-Star vs #7 Player (12:05-14:25 in the video)
This is such a classic GoWipe attack! No witches used, max troops levels. 55% deuce!
Good luck in your own GoWiPe attacks!
I have a new YouTuber I'm following: Ed, a leader in the top ten clan, Quantum's Web. Ed just hit #7 in the world so he knows his stuff. He is especially good with Balloonion, so expect more videos from him later. Below are some links and comments he shared recently.
Clan War 4: Quantum Web vs Up All Night
GoWiWiPe TH10 3-Star (9:25-11:30 in the video)
3 Golems 3 Witches 2 Pekka 10 wb 6 barbs with 3 Freeze 2 Rage
The attacker faces a popular "Southern Teaser" base - coming from the South tends to fail, and the North has a lot of compartments, so coming from East/West is a common route for Golem attacks.
Here he lays down Golems nicely spread out and basically "clips" the buildings down South so that the main force coming in through the middle hole will not be distracted to wander south, but will instead head into the core and take down the TH. Coming from East he takes on just one inferno at a time. Witches and wizards come behind the heroes and pekka and are nicely protected.The broad spread, witches, and great use of spells actually result in a 3 Star versus a solid TH10 base.
New School Hog Raid - Heroes First (16:15-18:26 in the video)
40 Hogs 4 Witches 5 Wiz 7 Barbs with 2 Heal 2 Freeze 1 Rage
Hogs were seriously hurt by the last Clash of Clans update, but they're not dead! How they are used has changed a bit. The key change was unlurable heroes, and the new approach to deal with them at high levels is with heroes and witches to take out the opposing CC and royals. In this attack by Jenscee of Quantum's Web, he starts the raid with a couple of hogs to lure the CC and to detonate giant bombs. Their CC is killed with his own CC followed by King and Queen. As the army moves inside they get in range of the opposing AQ and BK where they are killed using hero abilities with wizard and witch backup. Once the heroes are under control, the attackers unleashes the hogs from the opposite side, in a double stream, with two heals near WT and possible bombs, then double freeze as they get near the infernos plus a well timed rage. An incredible 3-star attack! Had the hogs failed up north, this is still a definite 1-2 star attack -- unlike the old school hog attacks which got 3-stars or failed spectacularly!Balloonions in Champions League - Balloon Academy
Seriously pro balloon-minions attacks. Go check out this playlist!It includes several great two-star attacks on maxxed TH10'sJodecast Defense Series - Episode 11 LIVE
Outstanding GoWiPe TH10 2-Star vs #7 Player (12:05-14:25 in the video)
2 Golems 4 Pekka 16 wb 17 wiz 15 arc w/ 2 Freeze 1 Rage 1 Jump 1 Lightning
This is such a classic GoWipe attack! No witches used, max troops levels. 55% deuce!
- Approach: all sides equally close to TH, he chose the side with CC opposite TH so they would pull his pekka right on top of the TH later. BK and AQ are lined up so they won't distract.
- Golem Deployment: a common question is 'How far apart do I deploy my Golems?' This video shows one great way to do it - as far apart on one side you can get them where every defense on that side is firing at the golems. Wider than that and middle units are not protected. Closer together and your % destruction will decrease.
- Immediate row of clearing wizards behind golems. He gets wiz out immediately to kill those defenses firing on the golems and kill the whole row of buildings. This is crucial so that pekka coming soon do not get distracted and wander around the base! You'll want to use 7-10 wizards to do this. Do NOT bunch them up lest giant bombs kill a bunch. Note: I love to sprinkle a few barbarians in first, even before the golems, to detonate any such bombs.
- Wall Breakers. No rush! Focus on the wizard first, why let the golems go further in and attract even more fire before you have those buildings cleared? How many you need depends on wall level and wb level, but bring extra in case you hit spring traps or a surprise tesla. If a max wiz tower is firing on your golem, don't drop wbs right there, every one will get killed.
- Pekka. Only now is it pekka time! These gals come in the middle, once their path to the center is quite clear.
- Core wizards / witches - then King and Queen - in this raid just a few, but behind golems come and center-going ranged troops. Your heroes are usually the last troops deployed. Make SURE you know where they will head before deploying them. Versus a hard base like this you want them in the core. Versus a weaker base you might intentionally send one or more around, behind a golem, for extra % or a three-star attempt.
- Jump spell. (or wall-breakers, under freeze/rage if no jump). With the units out, carefully lay down the jump spell to finalize the pathway into the core. This lasts a long time. Note he has NOT used any rage yet? Why? He has not needed to! He has one which he will save until really needed. Be patient with the rage, be early with the jump.
- Rage spell. Often this will be deployed when you are just about to enter core, with a forward deployed rage to help you face royals, CC, and TH.
- First Freeze spell. You can (and often should) freeze their heroes! If you get a chance to freeze 1-2 heroes and an inferno and tesla like this, do it!
- BK Iron Fist. When the BK is about to hit the TH is a super time to activate his special ability! You really want to let him take some damage before activating.
- Second Freeze spell. Very well deployed here, catching the CC and the back inferno. By doing this, his raged pekka/BK were not distracted and wiped out TH.
- Lightning Bolt. A bolt is a great spell to take with GoWiPe. A CC full of 35 archers or wiz/arc or witches can be a nightmare distracting and killing your main force right as they should be focusing on the TH. A bolt takes care of them easily, and doing it after the freeze avoids a miss.
- AQ Royal Cloak. With the core wiped out he is sitting at around 40%, needing to get to 50%. Do not waste your queen's ability early, be sure to wait until she is injured, ideally when a defense is close to killing here so it will change targets.
- Deploy Final Units. It is a great idea to hold back a small number of wizards or archers to pick off the last building or two to get 50%. In this raid, the attacker did not need his CC earlier and has the whole CC left to get the last few %. For us mortals, we would deploy the CC up front with our pekka's or 'core wizards/witches'
- Watch the Replay. Learn from your own attacks, see what went well, what didn't, what to do different next time :)
Good luck in your own GoWiPe attacks!
Thursday, August 7, 2014
Dragloonions - Theory and Practice
In a recent Clan War, Meowr Jr pulled off an impressive attack on a TH9 base that others were scared to touch -- a base which had a number of centralized Air Defense units and a highly centralized clan castle. How to break into the core and take down the town hall? Could another TH9 two-star this base?
In this video Meowr shares his thought process in planning the raid...
And in this follow-up video, Bax provides a running commentary on the attack. Can Meowr pull off his game plan for this base?!
For more insights on the Dragloonion attack, check out Meowr's tutorials on Dragloonion, Rage Looning or Loon Splat.
In this video Meowr shares his thought process in planning the raid...
And in this follow-up video, Bax provides a running commentary on the attack. Can Meowr pull off his game plan for this base?!
For more insights on the Dragloonion attack, check out Meowr's tutorials on Dragloonion, Rage Looning or Loon Splat.
Rage Looning 101
Why Rage-Loon:
Balloons are powerful troops, held back by their slow speed. This is why Rage pairs so nicely with balloons, but it’s not because of the extra power Rage gives (though it is a bonus), but the speed boost that it offers.
Objective of this course:
The objective is to teach you to be able to cause as much defensive building destruction, as fast and efficient as possible.
Theory:
They key is to drop the Rage FIRST, then deploy loons within the Rage radius. This will allow your loons to start off at full speed, saving precious seconds of travel time. The seconds you save, will mean the difference between destroying a lot of defensive buildings, or destroying only a few or none at all.
Because of this, you should take a few seconds to initially recognize where you can drop a Rage to maximize its radius, and where to drop your balloons so that they can cause as much destruction as possible.
Qualifying your target:
This is a prime example of what to look for, when Rage-Looning: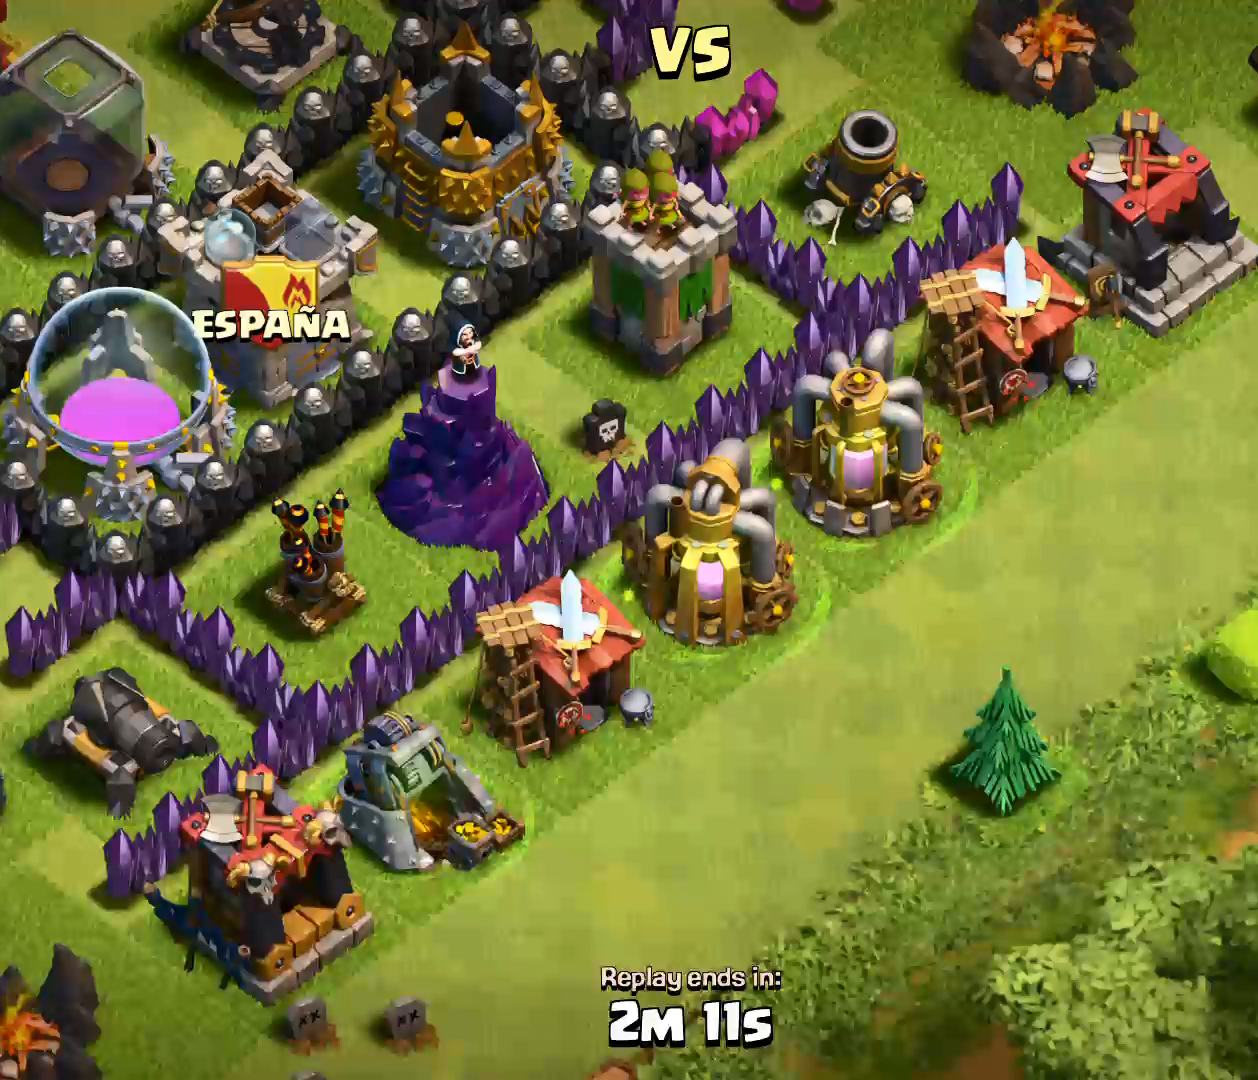
Notice the 3 anti-air defenses, all in a row.
Notice that the buildings in front of the walls is tucked in tight? This means the balloons have a shorter amount of travel to get to their targets.
This is the BEST CASE scenario for a Rage-Loon. So we will use this as our main learning example.
Instructions:
Now that you’ve identified WHAT you want to destroy, the next step is to figure out the best way to destroy it.
Drop a Rage. Drop some balloons. Easy right?
Well, the WHERE and HOW make a significant difference, as to how many balloons are needed to destroy these 3 buildings.
First the WHERE:
When you drop a Rage, think of it as dropping it on the CENTER SQUARE of a tic-tac-toe grid. For all intents and purposes, we shall assume radius of a Rage can cover nine 3x3 buildings.
You want to reach the Rage to reach the top squares (defensive buildings), and the bottom squares (where you will deploy the balloons).

First drop the Rage on the Purple X. Then drop the balloons on the black dots. Each drop point of a balloon should make the balloon travel up to the corresponding defensive building. This covers the WHERE.
Second is the HOW. How many balloons in which dot?
In general, a total of 6 balloons should do the trick, but how you deploy them makes a BIG difference.
If you send 2 to the Archer Tower, then 2 to the Wizard Tower, then 2 to the Air Defense, IN THAT ORDER, they WILL all be destroyed.
On the other hand, if you reverse the order, and send 2 to the Air Defense first, then there is a good chance the AD will survive.
BUT IF you send 3 balloons to the Air Defense, then 2 Balloons to the Wizard Tower, and 1 balloon to the Archer Tower, they will all likely be destroyed.
The reasoning is: the first balloons you send, will likely be be destroyed before it can drop a bomb. So you either send more to the Air Defense initially, or you send the first ones away from the Air Defense as a distraction.
If you send 2 to the Archer Tower, then 2 to the Wizard Tower, then 2 to the Air Defense, IN THAT ORDER, they WILL all be destroyed.
On the other hand, if you reverse the order, and send 2 to the Air Defense first, then there is a good chance the AD will survive.
BUT IF you send 3 balloons to the Air Defense, then 2 Balloons to the Wizard Tower, and 1 balloon to the Archer Tower, they will all likely be destroyed.
The reasoning is: the first balloons you send, will likely be be destroyed before it can drop a bomb. So you either send more to the Air Defense initially, or you send the first ones away from the Air Defense as a distraction.
Here is the finished product:
http://youtu.be/cOveXrd8gPg
Final Notes:
When dropping the rage, erring on the side of “closer to the defenses” is better than erring on “dropping farther from defenses”.The Rage spells stays for quite a while. In my example video, you can see that I dropped a 3rd balloon toward the Air Defense fairly late. The long Rage time gives you an opportunity to add more balloons if you think you did not deploy enough. You just have to pay attention, and send more balloons as soon as possible. Do NOT trickle in the balloons.
Dropping balloons in a small line (instead of tapping on the exact spots) is possible, but the results can be erratic.
Initially deploying 2 more balloons than necessary, is far better than initially deploying 2 less balloons than necessary. Err on the side of overkill.
Loon Splat 101
Why Loon Splat:
When balloons are destroyed, they drop to the ground and cause damage. Against buildings, the damage seems small, but against small CC troops, the damage is significant. Using (sacrificing) one or two balloons can allow you to wipe out CC troops, while at the same time, save you from having to carry a Lightning Bolt Spell. Having an extra Rage Spell, or Heal Spell, is extremely beneficial, compared to the small sacrifice of one or two balloons.
Objective of this course:
To teach you how to perform a Loon Splat., thus eliminating your need for a Lightning Spell, and to make you feel all giddy inside when all of the CC troops die from a SPLAT!
Qualifying for a Loon Splat:
First, you need to get ALL of the troops out of the enemy CC. This works best when the CC is full, and/or if the CC has multiple wizards. This usually occurs in Clan Wars, where there are several archers and wizards in the CC.
This will not work if the CC is filled with aerial troops.
This will not work if there are less than 10-12 archers.
Instructions:
Once you have lured all the troops out of the CC, you need to gather them in one tight clump like this:
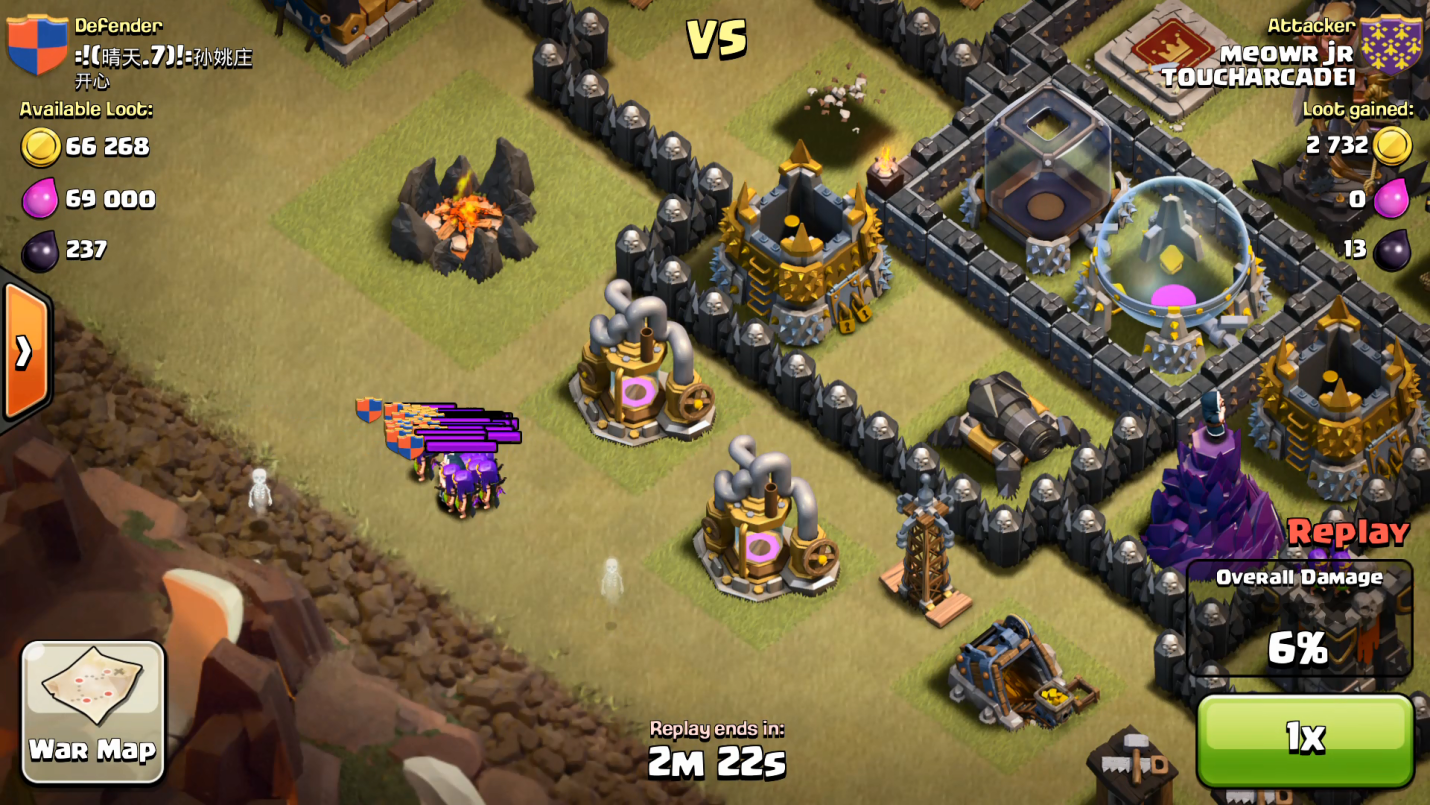
Now, find the closest defense, and drop one balloon roughly 2-3 squares further away from that defense.
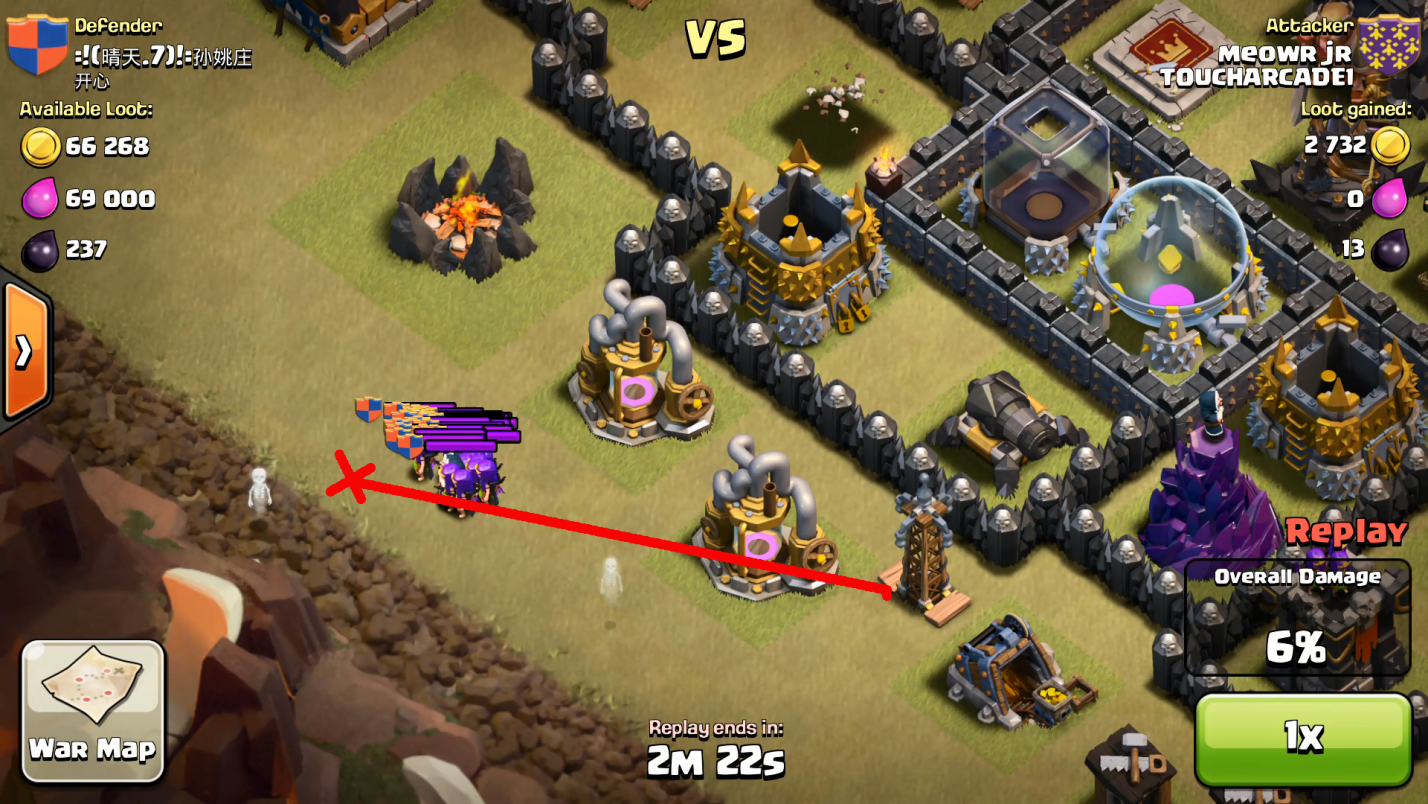
This is the end result:
Another example:
Notes:
Level 6 Wizards (red robes) cannot be taken out with one balloon. A second balloon is recommended to finish them off.
Notice on the second example, that troops will avoid walking through the center of decorations. This will make grouping up CC troops a bit more challenging.
When trying to position the clumped up CC troops, try to make sure there is only ONE obvious defense that the balloon will head toward. If in doubt, lure the troops to a place where the ONE closest defensive building is obvious.
It is extremely useful, before deploying the balloon, to check for the direction it will go, THEN ZOOM IN. This will allow you to place the balloon in a more exact position. Extremely helpful on phones, as well as tablets.
This WILL take practice. Don’t give up!
Wednesday, August 6, 2014
Dragaloonion example - TH8 three-stars TH8
In clan wars it is essential for TH8 bases to be able to 2- and 3-star other TH8 bases reliably. Balloonions (balloons and minions) are very good at this. In many cases adding one or dragons to the mix can help -- the Dragaloonion attack. TA1's ltbaxter provides narrated commentary on a sample TH8 three star with a one-dragon Dragaloonion. This is from visiting a clan war by CBC Ballas. Watch this blog for more Dragaloonion attacks and even a Dragaloonion guide :)
Subscribe to:
Posts (Atom)